Picture this: you’re lugging a heavy bucket of fertilizer across your garden. It tips over, spills everywhere, and now some plants get too much while others starve. Uneven growth follows, and you waste hours on the mess.
You’ve probably faced that frustration too. Hand-mixing fertilizer takes time and often leads to patchy results. But inline fertilization changes everything. It mixes nutrients directly into your irrigation water, so every plant gets an even feed automatically.
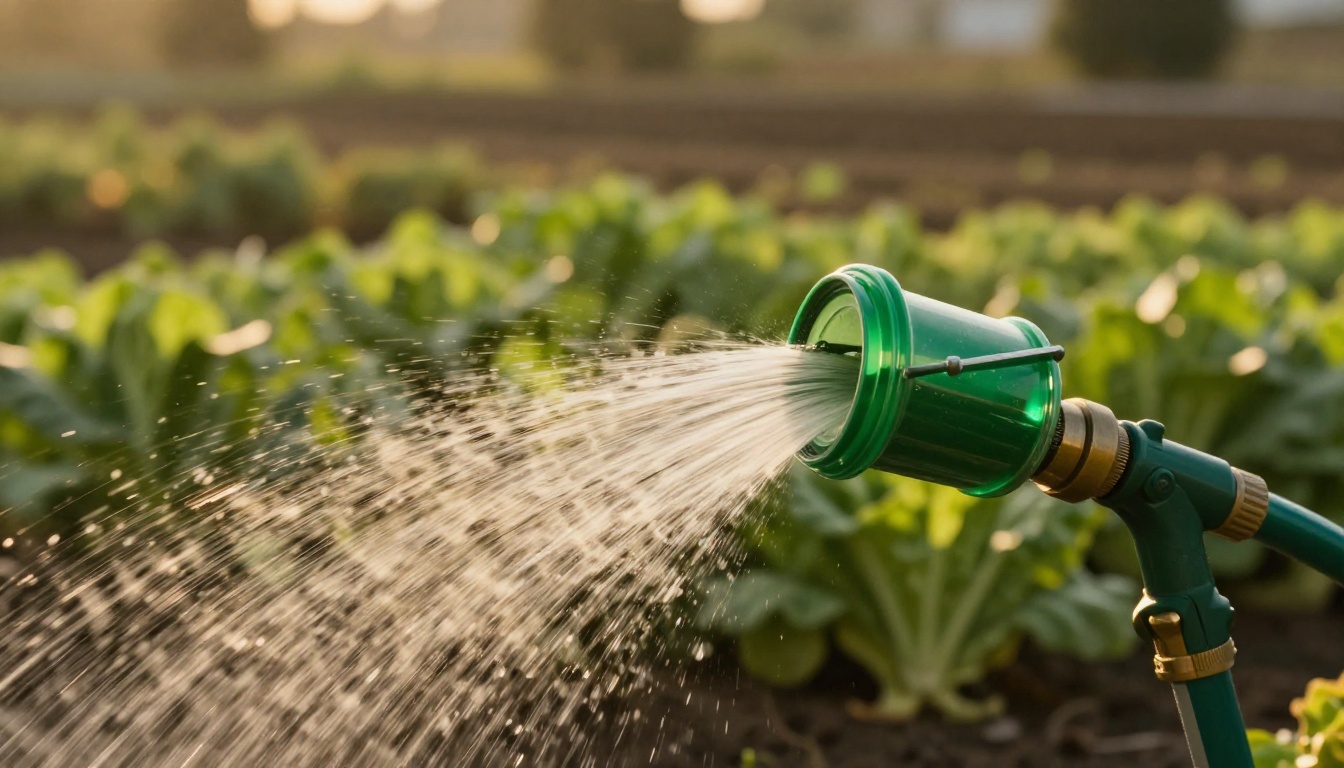
That’s where a Venturi injector comes in. This simple device uses fast-moving water flow to suck fertilizer from a tank, no pumps or electricity needed. It’s low-cost, reliable, and perfect for beginners.
You save hours each week because the system runs itself during watering. Plants grow healthier with consistent nutrients, leading to bigger yields and less waste. Setup takes minutes, and it works with drip lines, sprinklers, or hoses.
In this guide, we’ll cover it all step by step. First, you’ll learn how a Venturi injector works and why it’s better than other options. Next, we pick the right size for your setup, from small gardens to larger fields.
Then, we walk through easy installation with photos and tips to avoid common mistakes. You’ll see how to mix fertilizers safely and adjust rates for different crops. We also troubleshoot issues like low pressure or clogs, plus maintenance to keep it running smooth.
By the end, you’ll set up your own system confidently. Ready to ditch the buckets and grow better? Let’s dive into the basics right now.
How a Venturi Injector Works to Mix Fertilizer Effortlessly
You want even nutrient distribution without the hassle of buckets or pumps. A Venturi injector makes that happen by pulling fertilizer into your water line automatically. Water rushes through a special shape that creates suction, drawing in liquid fertilizer from a tank nearby. No electricity powers it, and no moving parts mean less to break.
Picture water entering the device, speeding up in a narrow spot, then slowing down again. That speed change drops pressure and pulls fertilizer like a vacuum. You connect it inline between your hose or pipe and irrigation system. For best results, your water pressure stays between 20 and 60 PSI. Flow rates around 2 to 10 gallons per minute work well for most gardens. This setup feeds drip lines or sprinklers perfectly, so plants get steady nutrition. Let’s break down the pieces and the simple science behind it.
Key Parts of Your Venturi Injector
Most Venturi injectors share core components that keep things simple and tough. You pick one made from PVC for light use or brass for heavy duty, since both resist corrosion. Always match inlet and outlet fittings to your hose size, like 3/4-inch garden hose threads, to avoid leaks. Here are the essentials and what they do:
- Body or housing: This main tube holds everything. Water flows through it, and the narrow throat inside creates suction. Choose clear plastic versions to spot clogs early.
- Inlet and outlet fittings: These connect to your water source and irrigation line. They use standard threads, so you screw them right onto hoses or pipes without adapters.
- Suction line with filter: A tube dips into your fertilizer tank. The filter at the end keeps dirt and debris out, preventing clogs that stop flow.
- Adjustable knob or valve: Twist this to control suction strength. It sets how much fertilizer mixes in, so you fine-tune for weak or strong solutions.
- Check valve: This one-way flap stops water from flowing back into the fertilizer tank. It keeps your mix clean and prevents contamination.
- Pressure gauge (on some models): It shows water pressure at a glance. Use it to check if your setup hits the sweet spot of 20-60 PSI.
These parts assemble in minutes. Match everything to your system’s pressure for reliable suction every time.
The Science Made Simple: Venturi Effect in Action
Water moves fast through a tight space, pressure drops, and suction pulls in fertilizer. That’s the trick at work here. Try this at home: pinch your garden hose to speed up the spray. Stick a straw nearby, and you feel it suck air. The injector does the same on a bigger scale.
Water enters the inlet, hits the narrow throat (the skinny middle), speeds up, then exits the outlet. Fast water means low pressure around the throat. That vacuum draws fertilizer up the suction tube from your tank. A check valve ensures it only goes one way.
Imagine sipping a thick milkshake through a straw. You suck harder, pressure drops, and the shake rises. Your injector uses water power the same way. No motors or batteries required.
For a quick visual, think of this simple flow: water in (wide) > throat (narrow, suction port) > water out (wide again). Fertilizer joins at the throat and mixes downstream.
Dilution ratios start at 1:100 (one part fertilizer to 100 parts water), but the adjustable knob lets you change it. Higher pressure, like 40 PSI, boosts suction for thicker mixes. Aim for 3-5 GPM flow to keep it steady. Low pressure below 20 PSI weakens pull, so add a booster if needed.
This powers inline fertilization beautifully. Drip systems get precise feeds, sprinklers cover lawns evenly. Plants thrive because nutrients arrive dissolved and consistent. You adjust once, then let it run. Simple, right?
Top Benefits of Venturi Injectors for Inline Fertilization
You started gardening to enjoy fresh produce, not to wrestle with fertilizer buckets. Venturi injectors deliver real wins for beginners because they mix nutrients right into your water line. Plants get what they need every time you irrigate. No more guesswork or waste. These devices shine in small gardens or larger plots up to 1,000 square feet. Best of all, they cost under $50 for basic models. Let’s look at the key advantages that save you time and boost results.
First, uniform nutrient delivery stands out. Water rushes through the injector and pulls in fertilizer evenly. Every drop carries the same mix, so roots absorb steadily. This prevents nutrient burn from hot spots or weak growth from dry patches. For example, tomatoes in your backyard drip system stay lush and produce more fruit. No yellow leaves or stunted plants.
In addition, it automates feeding during watering. Connect once, and the system runs itself. You turn on the hose, and fertilizer flows in automatically. This cuts labor compared to manual mixing, where you haul buckets and measure by hand. Gardeners save 2-3 hours per week on average. Spend that time harvesting instead.
Besides that, Venturi injectors work with your existing setup. Screw it onto standard 3/4-inch hoses or drip lines. No need for pumps or rewiring. Electric injectors rely on batteries that die or motors that fail in dirt. Your Venturi uses water pressure alone, so it’s reliable year-round. Rain or shine, it keeps going.
Water savings add up too. Efficient fertigation means less runoff and evaporation. Plants use nutrients better, so you apply 20-30% less fertilizer overall. Lawns stay green with half the effort. One user watered their 500-square-foot yard and saw thicker grass without puddles.
Here are the top benefits in a quick list:
- Even distribution: Stops overfeed or underfeed issues for healthy growth.
- No electricity needed: Runs on your water flow, unlike battery-powered rivals.
- Low cost: Basic units start at $30-50, pays for itself in one season.
- Easy automation: Feeds while you water, frees your schedule.
- Versatile fit: Pairs with drips, sprinklers, or hoses right away.
- Less waste: Precise mixing saves water and fertilizer money.
Most importantly, real results show fast. A beginner with raised beds reported double tomato yields after switching. Lawns green up evenly without stripes. You get pro-level fertigation without the hassle. Simple changes like this build confidence quick.
Step-by-Step: Setting Up Your Venturi Injector Right
You grasp how the Venturi effect pulls in fertilizer smoothly. Now set up your own system without headaches. Start by picking the right parts, then install safely. This process takes under an hour for most gardens. Follow along, and you’ll feed plants evenly from day one. We break it down into simple choices and steps, so beginners succeed every time.
Choosing the Right Size and Fertilizer for Your Setup
Match your injector size to water flow first. Small gardens with hoses need units for 0.5 to 2 GPM. Larger irrigation lines call for models handling 5 GPM or more. Check your hose output by timing how long it takes to fill a gallon bucket. For example, a standard garden hose at 40 PSI flows about 5 GPM. Pick too small, and pressure drops; too big, and suction weakens.
Garden setups thrive on 3/4-inch injectors. Farms or big lawns use 1-inch or larger. Brass holds up for daily use, while plastic suits weekends. Always confirm flow matches the label.
Next, select water-soluble fertilizers only. Solids clog the suction line fast. Go for liquids like 20-20-20 balanced mixes or crop-specific ones, such as high-nitrogen for lawns. Start weak to avoid burn: mix 1 teaspoon per gallon of water in your tank. Stronger solutions, like 1 tablespoon, work later once you test.
Use a 5-gallon bucket as your tank for small yards. It feeds a 500-square-foot garden for hours. Place it nearby, lower than the injector. Add a filter screen on the suction tube end. It traps grit and saves your system from clogs.
In short, right size plus soluble fertilizer equals smooth runs. You adjust dilution over time for perfect plant health.
Safe Installation Tips to Avoid Leaks or Mistakes
Safety comes first, so wear gloves and shut off water before starting. Gather tools: pipe cutter, adjustable wrenches, Teflon tape, and PVC primer with glue if using rigid pipe. Clamps work great for hoses. These basics prevent slips and leaks.
Common pitfalls trip up new users. Wrong pipe size causes drips, so measure twice. Skip the filter, and debris blocks flow quick. No check valve lets water backflow into your tank, diluting stock bad.
For drip systems, install the injector before filters. This keeps fertilizer moving clean. Elevate the tank slightly below the injector line for gravity assist, but not too low or suction fails.
Here are the numbered steps to install right:
- Check water pressure. Screw on a gauge to your faucet or line. Aim for 20-60 PSI. Low pressure under 20 PSI needs a booster pump; high over 60 PSI risks damage.
- Cut the main line. Shut off water. Use a pipe cutter for clean edges on PVC or hose. Insert the injector with tees or straight fittings. For hoses, clamp tight. PVC gets primer and glue. Text diagram: Water source –> [Inlet fitting] Injector body [Outlet] –> Irrigation.
- Attach suction tube. Dip the filter end into your fertilizer tank. Keep the tank lower than the injector, about 2-3 feet. Secure with the check valve inline to stop backflow.
- Prime the system. Turn water on slow. Flush plain water 5 minutes to clear air. No fertilizer yet, so you spot leaks easy.
- Test injection. Add colored water or dye to the tank. Run 10 minutes. See suction pull it in evenly? Good. Adjust the knob for stronger mix if needed. No color means check pressure or clogs.
Troubleshoot low pressure early. Add a gauge after install to monitor. Clogs? Clean the filter screen. Leaks? Wrap threads with Teflon tape, three layers clockwise.
After setup, run a full test cycle. Your drip lines or sprinklers now deliver nutrients steady. Plants respond fast with greener leaves and strong roots. You did it right, so enjoy hands-free feeding. Next time, tweak rates for your crops.
Daily Use, Maintenance, and Quick Fixes for Long Life
Your Venturi injector runs smoothly with a basic daily routine. Fill the tank with your mixed fertilizer solution first. Turn on the water, then twist the suction knob to start the pull. Let it run until the tank empties for even feeding across your garden. After each session, flush with plain water for 5 minutes. This clears residue and keeps parts clean. In addition, store it drained and dry during off-seasons. These habits extend its life for years. Now, handle issues fast and clean right to avoid downtime.
Spotting and Fixing Common Problems Fast
Problems pop up sometimes, but you fix most in minutes. Low suction often means low PSI or a clogged filter. Uneven mix points to the knob needing adjustment. Drips usually call for new seals. Prevention beats fixes every time, so check pressure weekly and rinse after use.
Here is a quick table of common issues, signs, and fixes:
| Problem | Signs | Quick Fix | Prevention Tip |
|---|---|---|---|
| No suction | No fertilizer pull | Check PSI (needs 20+); clean filter | Test pressure before runs |
| Uneven mix | Patchy plant growth | Adjust knob clockwise for stronger | Calibrate with dye test monthly |
| Drips or leaks | Water at fittings | Tighten connections; replace seals | Use Teflon tape on threads |
| Clogs | Weak flow overall | Backflush with water reverse | Rinse filter after every use |
As a result, you spot cracks or heavy wear during checks. Replace the whole unit then, because patches fail fast. Brass models last longer outdoors. Most importantly, a seasonal check in spring catches wear early. Inspect for cracks, test suction, and clean deep. This keeps your system reliable all summer.
Simple Cleaning Routine to Keep It Flowing
Dirt builds up from fertilizer, so clean regularly. Weekly rinses take 10 minutes and prevent clogs. Disassemble the parts after flushing. Brush the throat and suction tube gently. Soak everything in a mild acid like vinegar water (1:10 mix) for 30 minutes. Rinse well, then dry fully with a cloth. Air drying works too, but speeds things up.
Monthly deep cleans go further. Take apart the check valve and fittings. Soak overnight in the same vinegar solution. Scrub with a soft brush, focusing on the narrow throat. Eco-friendly cleaners like citric acid avoid harsh chemicals. They break down minerals without harming your plants later.
Follow this simple schedule to stay ahead:
- After every use: Flush 5 minutes plain water.
- Weekly: Disassemble, brush, vinegar soak, dry.
- Monthly: Full teardown, overnight soak, deep scrub.
- Seasonal: Full inspect, pressure test, replace worn parts.
Dry parts completely before reassembly. Moisture causes corrosion over time. Besides that, vinegar costs pennies and works great. You save money and keep flows strong. Plants thank you with steady growth. Handle it right, and your injector lasts seasons without hiccups.
Conclusion
You now know how a Venturi injector simplifies inline fertilization. It pulls fertilizer into your water line with basic pressure, so plants get even nutrients every time. Setup takes under an hour, and maintenance stays quick with flushes and checks. In addition, you save hours weekly while boosting yields from tomatoes to lawns.
Is it worth it? Yes, because healthier plants mean less work and more harvest. Ditch those messy buckets for good. Buy a Venturi injector today, then install it this weekend. Your garden thrives right away.
Share your setup stories or questions in the comments below. Subscribe for tips on advanced fertigation next. You got this; watch your plants grow strong.