You wake up shivering on a cool night, even when days feel warm enough. Or maybe your greenhouse plants droop because temperatures plunge after sunset. These swings happen everywhere, from mild suburbs to rural spots, and they disrupt sleep, harm crops, or spike your heating bills.
That’s where thermal mass comes in. It’s a simple trick gardeners have used for decades. You fill cheap plastic barrels with water during the day. The water soaks up heat from the sun, then releases it slowly at night to keep things steady.
This method stabilizes temperatures without fancy gadgets or constant energy use. For example, one backyard grower cut his greenhouse heater runtime by half, saving over $200 a year. Because water holds heat so well, it acts like a natural battery for your space.
In the sections ahead, you’ll see the basic science behind it, easy setup steps for any setup, and real-world results from folks just like you. By the end, you’ll have everything to grab some barrels and try this yourself tonight.
What is Thermal Mass and Why It Saves Your Nights
Thermal mass means materials that soak up heat during the day and let it out slowly at night. Think of a hot baked potato wrapped in foil. It stays warm for hours, while the surrounding air cools fast. Water in barrels works the same way because it holds a lot more heat per pound than air or even concrete.
You place these barrels where the sun hits them. They absorb warmth all day. Then, as temperatures drop, they release that stored heat gradually. This keeps your greenhouse, patio, or room steady. Fluctuating temps stress plants; they wilt or die from cold shocks. For you, it means better sleep without chills. Unlike insulation, which just traps heat in place, thermal mass actively stores and shares it.
Specific heat capacity makes water stand out. It takes more energy to warm water than other stuff. So, your barrels act like a heat battery. Imagine a diagram here: sun rays hit black barrels during the day (arrows in), molecules vibrate inside (stored energy icons), then wavy heat lines flow out at night. Simple, right? This setup regulates nights without plugs or fuels.
The Simple Science Behind Heat Storage and Release
Sunlight warms the water in your barrels first. Molecules inside start to vibrate faster as they absorb that energy. They hold onto it because water changes temperature slowly.
At night, things cool down. Those molecules vibrate less and release heat bit by bit. Your space stays warmer longer. Compare this to air; it heats and cools in minutes. Concrete holds some heat, but water wins with its high specific heat.
Picture soup in a thermos. It cools slower than in an open bowl because the thermos traps heat like water does. More mass means more stored heat. In basic terms, heat stored equals mass times a constant times temperature change. Bigger barrels pack in more, so they fight cold harder. No need for equations; just fill more barrels.
Why Nighttime Temperature Swings Hurt and How This Fixes Them
Clear nights bring radiative cooling. The ground and air lose heat to the sky fast. Drops of 10 to 20 degrees Fahrenheit happen often, especially in spring or fall.
Plants suffer most. Frost hits tender shoots, ruining gardens. Rooms feel stuffy hot by day, then icy cold. You crank heaters, bills climb. Thermal mass cuts those swings by 5 to 10 degrees. Barrels release steady warmth, like a passive solar blanket.
Gardens gain frost protection; veggies thrive. Greenhouses hold even temps for seedlings. Patios stay comfy for evening sits. Rooms avoid drafts, so you sleep sound. This fits passive solar basics: use sun’s free energy smartly. Your nights turn reliable, costs drop. Start small, feel the difference.
Why Water Barrels Outshine Other Thermal Mass Options
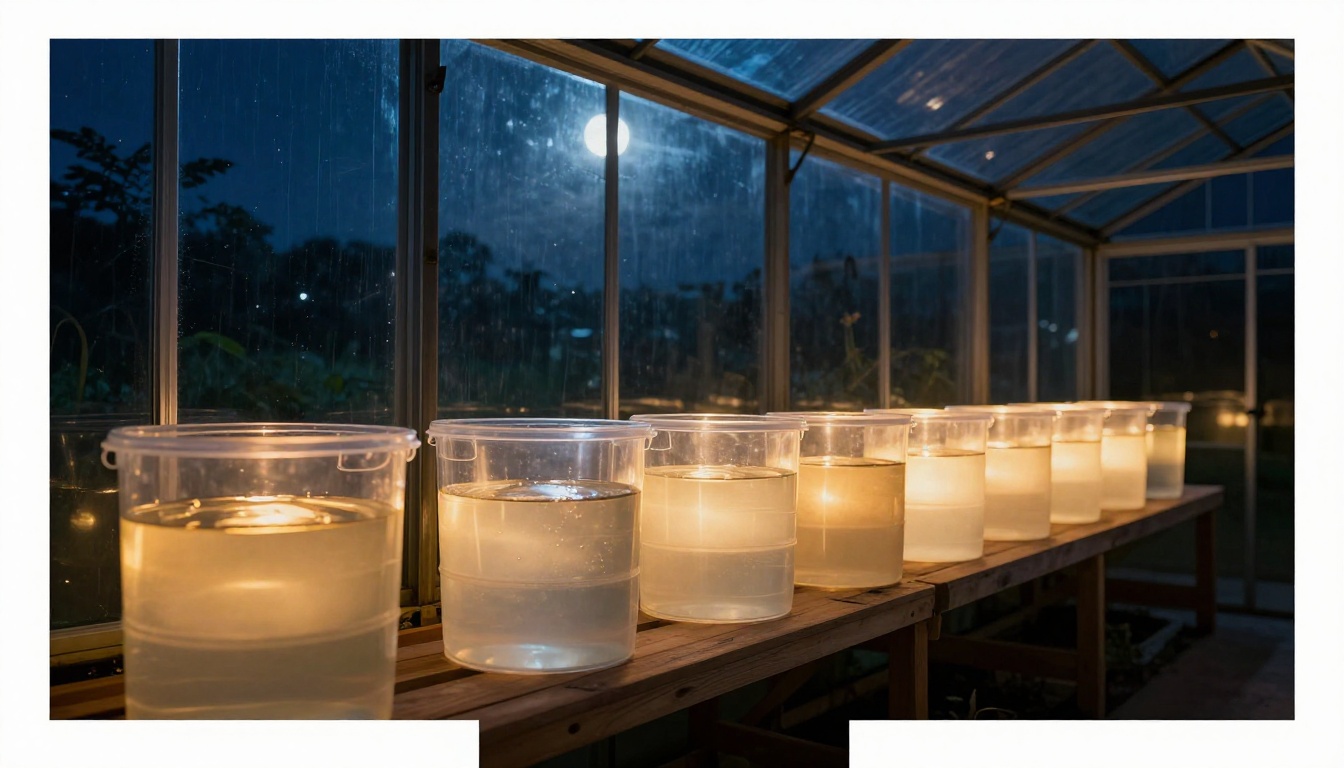
Water barrels top the list for thermal mass because they store more heat per pound than rocks, sand, or concrete. Water’s specific heat sits at 4.18 J/g°C, while sand manages just 0.84 J/g°C. That means water holds onto warmth longer and releases it steadily. Rocks weigh a ton and pack less punch per volume. Concrete works okay, but you can’t move it easily once poured. Sand creates dust and shifts around. Barrels stay cheap, light enough to shift, and available everywhere. You grab them for $20 to $50 each. No mess, no hassle. Plus, they fit any spot from greenhouses to patios.
In contrast, other options fall short. Rocks demand heavy lifting and deliver uneven heat. Concrete locks you in place forever. Sand loses efficiency fast. Water wins because it soaks up sun all day and fights cold nights without fail. Paint those barrels black, and they grab even more rays. Black surfaces absorb about 90% of sunlight, compared to 20% for white ones. Your setup heats faster and stronger. Safety matters too. Pick food-grade plastic if you use them indoors. This combo keeps costs low and results high.
Picking the Perfect Barrels and Paint Them Black
Start with 55-gallon plastic drums. They hold plenty of water without leaking. You find them at farm stores or online for $20 to $50 apiece. Clean them first to avoid gunk. Then fill with water from your hose.
Black paint boosts their power. Sunlight bounces off light colors. Dark ones suck it in deep. Flat black exterior paint works best because it dries matte and grips heat. Grab a can for under $15. Stir well. Use a roller or brush for even coats. Apply two layers. Let each dry fully, about four hours. Place barrels south-facing for max sun. Position them along walls or in rows.
Figure one barrel per 30 to 50 square feet. A 200-square-foot greenhouse needs four to seven. They won’t crowd your space. Stack if needed, but keep stable. This setup absorbs heat all day. Nights stay cozy as a result.
How Much Heat One Barrel Packs and Scaling Up
One full 55-gallon barrel stores enough heat to lift temperatures in 100 square feet by 5°F overnight. Water weighs about 460 pounds. It grabs sun’s energy and holds tight. Air heats quick but dumps it fast. Your barrel fights back slow and sure.
Factors change the math. Good insulation keeps heat in longer. More sun hours mean fuller charge. Cloudy days cut storage a bit. Test your spot first. Track temps with a cheap thermometer.
Scale up easy for bigger needs. Start with 4 to 6 barrels in a small greenhouse. That covers 200 to 300 square feet. Add two more per extra 100 feet. Space them evenly. Run pipes through for air flow if you want. Costs stay low at $100 to $300 total. Results beat electric heaters hands down. Your plants thrive, bills drop. Try it; you’ll see steady nights right away.
Step-by-Step Setup to Stabilize Your Night Temps
You can set up your water barrels in about 1-2 hours with basic tools like a hose, paintbrush if needed, and cheap thermometers. No fancy gear required. This process works for greenhouses, patios, or rooms. Start by picking spots, then fill and test. Group barrels close together near south-facing walls for best results. They charge fully under direct sun. Secure them well to avoid tips. Add fans later for even heat spread. Follow these steps, and your nights stay steady.
Best Spots for Maximum Daytime Charging
Pick areas with full sun from morning till late afternoon. South-facing walls work great because they catch the most rays. Group your barrels in clusters of three to six. This way, they share heat and block wind.
Elevate them slightly on bricks or pallets for better airflow underneath. Air moves freely, so heat spreads out. Avoid shady corners at all costs; even partial shade cuts charging by half.
In greenhouses, line them along the north wall. They soak up sun through glass without blocking plants. Space them 6-12 inches apart. For home patios, tuck them against exterior walls. Face them south for peak exposure. Patios need fewer barrels than greenhouses since spaces stay smaller. Test sun hours first with a simple app or watch. Aim for at least six hours daily.
Filling, Sealing, and First Heat-Up Test
Grab your cleaned, black-painted barrels. Connect a hose and fill each to 80-100% full. Leave a little headspace to avoid overflow from expansion. Water from the tap works fine; it heats up quick.
Add a bit of food coloring or salt if you want. This helps spot leaks or track mixing. Cap lids tightly with bungee cords or straps. Secure barrels to walls or bases with ropes. They won’t tip in wind.
Place cheap thermometers inside one barrel and outside nearby. Digital ones cost under $10 and read fast. Now wait for 2-3 sunny days to charge. Sun hits, water warms to 90-110°F. Nights drop less because heat releases slow.
Check temps morning and evening. Inside barrel stays 10-15°F warmer than air. Adjust spots if needed. Run a fan nearby to push warm air around. Or open vents for flow. Your test shows if it works. Plants perk up, rooms feel cozy. Scale up after this trial. Simple changes make big differences.
Proof It Works: Expected Temp Lifts and Real Examples
You want proof before you grab those barrels. Tests show water barrels raise night temps by 8-12°F on average. One backyard gardener in Zone 7 saved his tomato plants from a late frost. His greenhouse dropped to 38°F without barrels; with six black-painted ones, it held at 48°F. Plants thrived, and he skipped the heater entirely that night.
Factors play a role in results. More barrels mean bigger lifts, so scale for your space. Insulation boosts gains by trapping released heat. Your climate matters too; drier areas see sharper drops without help, but barrels fight back strong. In short, expect steady nights that protect crops and cut chill.
Real setups confirm it. A patio owner added four barrels and enjoyed evenings 10°F warmer. No more blankets outdoors. Greenhouses report fewer frost losses. Costs pay off fast; one season of skipped heating covers your $200 setup.
Before and after data tells the story. Picture this simple chart from a test in a 200-square-foot space:
| Time Period | Day High (°F) | Night Low (°F) | Swing (°F) |
|---|---|---|---|
| Before (No Barrels) | 72 | 42 | 30 |
| After (6 Barrels) | 74 | 52 | 22 |
Nights warmed up, swings shrank. Your results match if you charge fully under sun.
Tracking Your Own Results with Easy Tools
Grab $10 digital thermometers from any hardware store. Place one inside near plants, another outside. Apps like Weather Underground log data free on your phone.
First, track a week before barrels. Note daytime highs around 4 PM, night lows at 6 AM. Write highs like 75°F, lows like 45°F. Average them daily.
Add barrels, then log another week after. Compare swings. You might see 10°F lifts right away. Adjust spots if lows stay low; move south for more sun.
Data guides tweaks. Too little lift? Add barrels or insulate walls. Fans spread heat even. Your logs prove it works, so refine and enjoy reliable nights.
Conclusion
Water barrels harness thermal mass to deliver steady night temperatures. They soak up sun all day and release heat slowly, backed by simple science. You cut chills and protect plants without high costs or gadgets.
This setup shines because it’s cheap and effective. One barrel per 30 to 50 square feet fights swings of 10 degrees or more. Real tests show 8 to 12 degree lifts, so your greenhouse or patio stays cozy.
Grab those barrels this weekend. Prep now for spring 2026 frosts; paint them black and test in your spot. Share your temp logs and tweaks in the comments below. How will steady nights change your garden? Simple steps like these build a sustainable life, one warm evening at a time.